
Unpredictability and potential imperfections are part and parcel of film photography. These may be unplanned, like accidental double-exposures or light leaks, or they may be deliberate like shooting expired film or a Holga or Lomo camera.
The effect you see on these first of the roll photographs is another example of these supposed defects. I say supposed because not everyone sees them as a bad thing. Yes, some people do everything they can to minimise the chances of them happening, but others embrace them.
I’m in that second camp. I think having these kind of shots means having something truly unique. Because whatever imperfection is there on any particular image, it can never happen in quite the same way ever again.
So with all that said, let’s get into what you came here for. Everything there is to know about first of the roll shots. From what causes them to how you can deliberately make them happen, and what you can do with them once you have some.

Contents
- 1 What is a first of the roll photograph?
- 2 What causes a first of the roll photograph?
- 3 Why is the film burn effect on the left side of the image?
- 4 How far across the image will the film burn go?
- 5 Does the film burn ever go too far?
- 6 Can I make a first of the roll shot with any film camera?
- 7 What if the first of the roll is portrait aspect?
- 8 What other effects can film burn give you?
- 9 What about last of the roll images?
- 10 What can you do with your first of the roll images?
- 11 An ongoing archive of all my first of the roll photographs
What is a first of the roll photograph?
When you get some film developed, you could be finding that the first shot of your roll has an area of film burn along the edge of it. This is because the burnt part of the image was exposed to the light when you were loading your film, while the good part of it wasn’t.
This doesn’t always happen though; it depends on what camera you used and how you loaded your film into it. How far this burn extends across your image will also depend on those same two variables.
This is what seems to now primarily be known as a first of the roll photograph, although there are other ways to describe it too. Film burn, a burnt frame, a burnt edge even. But perhaps not a burnt end. That’s something else.
There’s a pretty big Instagram account that posts people’s #firstoftheroll photo submissions. You can find that @f1rstoftheroll and get your own published there too.
However, people embracing and sharing these kinds of photographs is nothing really new either. It’s not just some recent hipster fad. This Flickr group has been building up a collective archive of them since 2005, for example.

You might think having this effect on your first image is a waste of an exposure and wish it didn’t happen – especially if you only took one shot of whatever was in your first frame and wanted an unblemished photograph of it.
Or, like plenty of other people, you may like it. You may look forward to seeing what your first of the roll gives you each time you load your camera. You may even try to deliberately use it to make something creative.
I’ll be honest here and say I remember not being keen on the first of the roll effect when I got into shooting film. I’d dislike the shots I got with it in my scans and would just delete them. Because I didn’t see any reason to keep them. What would I even do with them? That’s a question we’ll answer later, by the way.
When checking my archives for shots to use in this post, there are quite a few sets where the first of the roll shot is missing. I now think that’s a shame, although I could just get the negatives rescanned if I really wanted them back.
So, that’s what a first of the roll photograph is.
It’s an image that displays some film burn down its edge, due to part of the frame being exposed to light when the film was loaded, and the rest of it – the normal part of the photograph – not.
Because of how most cameras are loaded and operate, this usually only happens with the first shot of the roll – although we will look at last of the roll photographs later too.


What causes a first of the roll photograph?
Understanding why a first of the roll photograph happens is good for satisfying your curiosity of course, but it’s something you need to know if you ever want to play around with this effect and make it happen deliberately.
Before we dig in and explain all this, take a look at this image. It illustrates, in the most simple way I can think of, what causes it to happen.

When you load your film into your camera, part of it is exposed to the light. That part of the film therefore becomes unusable. That’s why the frame that you could shoot on that section has a skull and crossbones on it in my picture. Because it’s dead.
Unless you’re loading your film in a darkroom, or just a very dark room, this is unavoidable.
The next frame along though is only partially exposed, with the majority of it still safely inside the film canister. Hence the happy face.
If you close the camera back now, shoot the dead frame and wind it on, the next frame will be partially burnt yet mostly good. And that will be your first of the roll shot.
You may want to fire and advance your film one more time before closing the back to make sure the film has been taken up on the spool correctly, and that’s okay too. As long as you have a frame partially exposed and partially still in the canister when you do close it, you should get a first of the roll shot.
If for some reason you want to avoid this effect though and ensure that every shot you take will be free from it, you can just close the camera back and fire off a few exposures until the film counter gets to zero and then begin shooting your proper frames.
But really, why not shoot a first of the roll one and then a normal one anyway? What have you got to lose?


Why is the film burn effect on the left side of the image?
If you’ve taken in what we explained in the last section, you may now be wondering this: if the burnt section of your image is to the right of the bit that’s still in the canister, why does the first of the roll effect appear on the left edge of your shot?
I agree it seems counterintuitive, but it can be easily explained with a simple rundown of how lenses work.
That’s why this next quite rudimentary image is here. To illustrate what we’re about to go through.
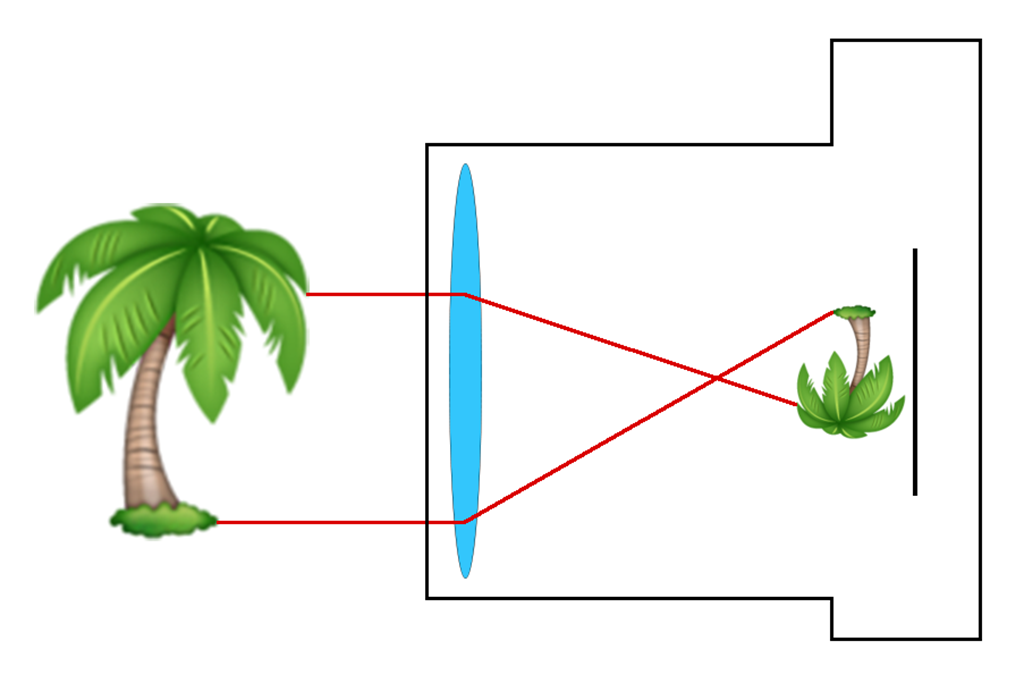
Without getting too technical here, when you’re shooting with your camera, its convex lens inverts the image onto the film. Or sensor if you’re shooting digital. This means it’s recorded upside down and back to front.
While the software in a digital camera will correct the image for when you view it on its LCD screen or your computer, obviously the latent image that is recorded on your film remains inverted.
In the normal process of developing and viewing analogue photographs, be that via printing, projecting, or scanning, this occurrence usually goes unnoticed. Because a negative or slide can simply be physically turned around to show the image how it was supposed to look.
However, turning the image around when you have some film burn down one side of your inverted shot will mean that is now on the other side when you view it normally.
And that’s why, in most cases, we see this effect down the left-hand side of the first of the roll shot.
I say most cases because not all cameras are the same when it comes to how film is loaded and used. For example, in a Rollei 35, you load the film from right to left, which will reverse this whole process and give you the film burn on the right-hand side.


How far across the image will the film burn go?
As mentioned earlier, quite how far the film burn – the first of the roll effect – extends across your image is mainly dependent on what camera you’re shooting with and how exactly you load the film before closing the camera back.
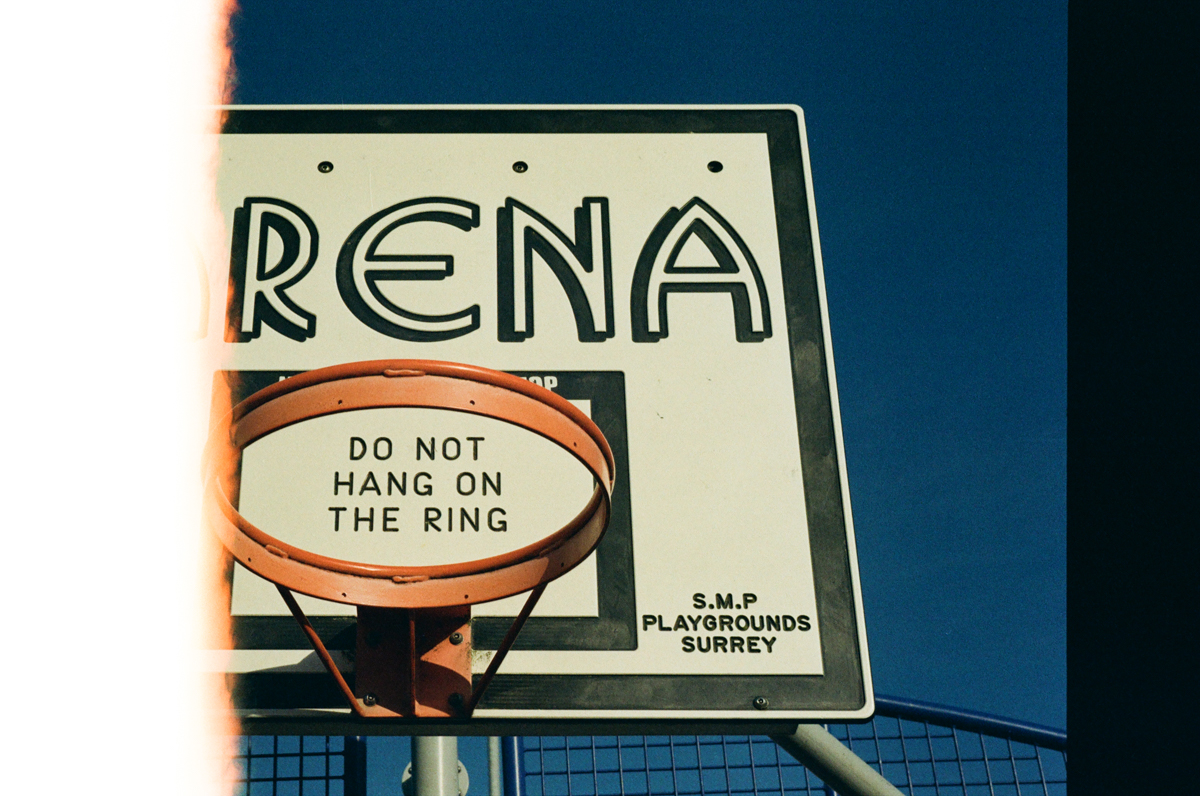
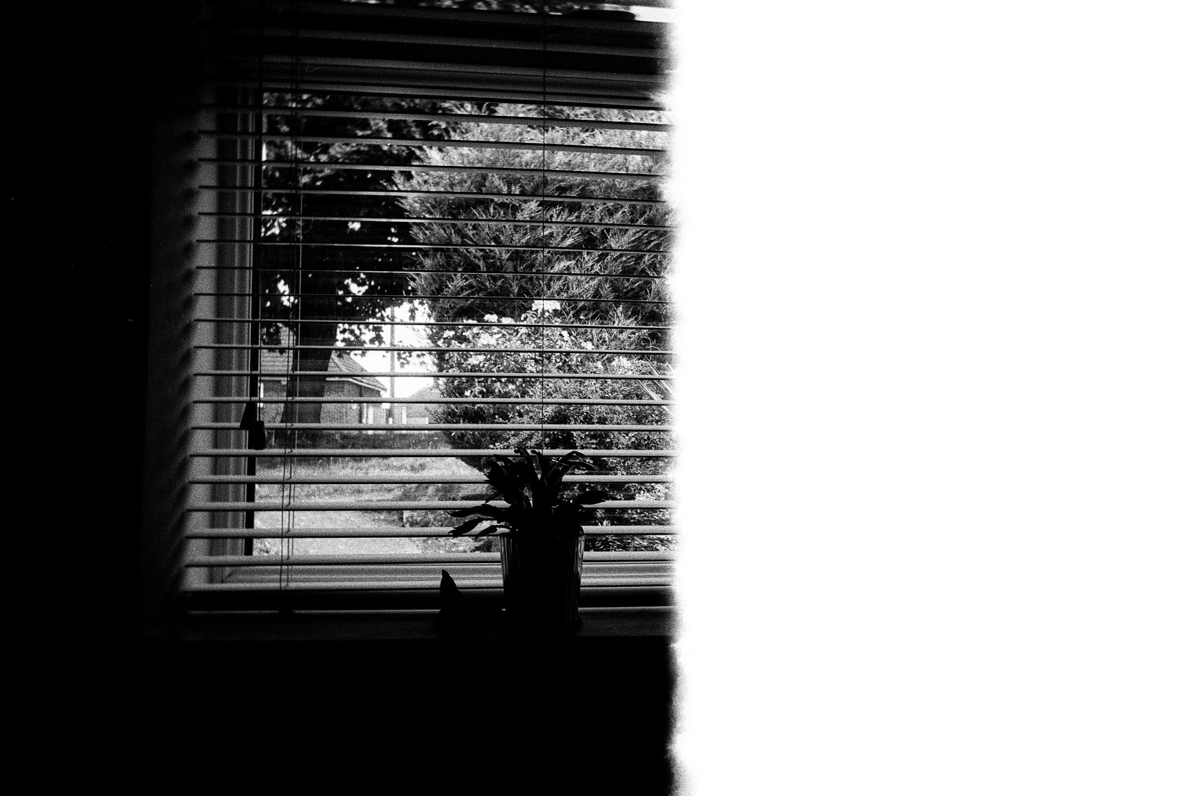
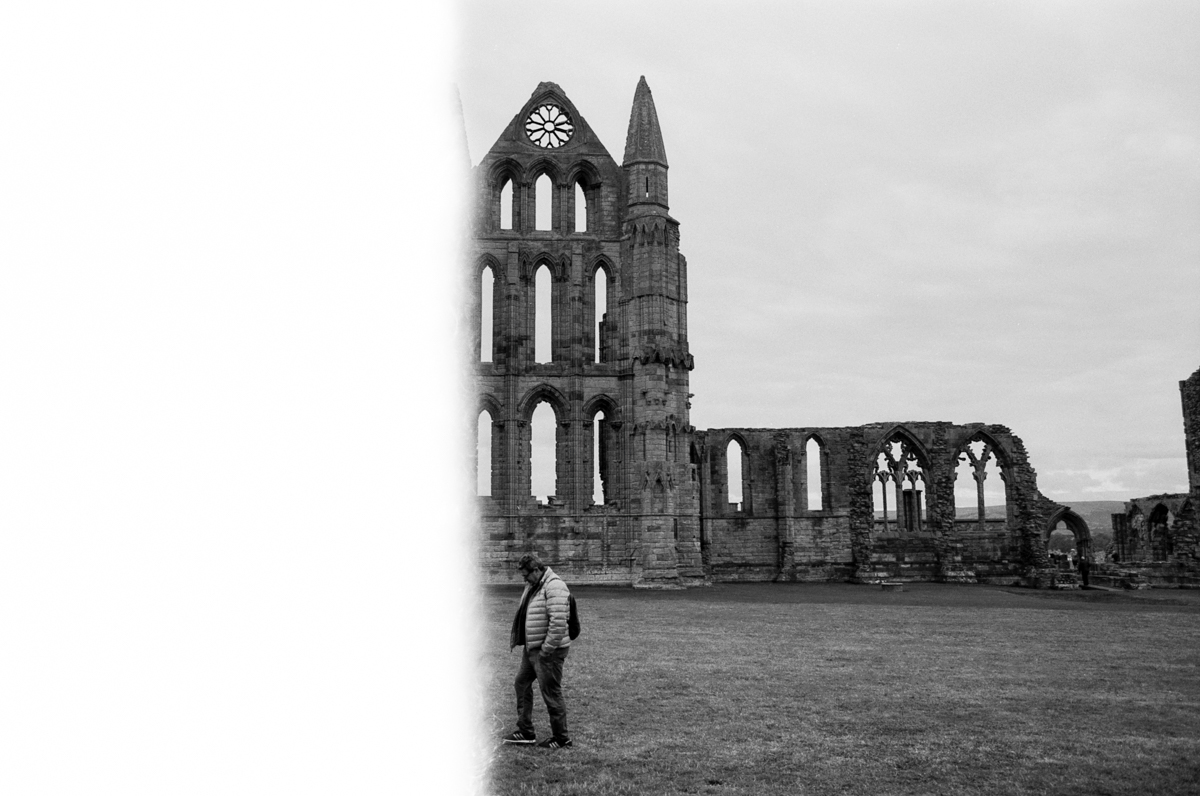
A lot of the images on this post have quite a narrow strip of film burn down the edge. These were all shot with the Lomo LC-Wide. Some though have a noticeably wider burn that extends further across the image. Most of these were shot with the Yashica Electro.
The only exceptions are the monochrome statue below, which was shot with the Pentax K1000, and the portrait aspect one you’ll see later which was shot with the Nikon FM3a.
Because the Yashica, Pentax and Nikon are all wider cameras than the little Lomo one, obviously you need to stretch the film further across when you load it onto the take-up spool.
I can’t speak for how every camera will behave, but it makes sense to me here that the smaller camera gives the smaller the strip of film burn – because more of my first frame was left inside the film canister as I loaded the film into it.
It’s worth noting too that the amount of film burn between the Yashica Electro, Pentax K1000 and Nikon FM3a was pretty close in terms of frame coverage. So if you have a normal-sized rangefinder or SLR, you could probably expect to have similar results if you load the film like I did.
You can also expect consistent first of the roll results from whatever camera you have so long as you load it the same way every time.
To illustrate what we’ve just explained, the first two images below were shot with the Lomo LC-Wide, the third one with the Yashica Electro, and the fourth with the Pentax K1000.


Does the film burn ever go too far?
Although you can expect to get similar amounts of film burn if you always load your camera the same way, I did end up with too much on a couple of occasions.
This is because I got into the habit of not being sure my film was securely on the take-up spool, so I would fire the shutter and then wind it on a touch. Not a full wind, but just enough to convince myself it was loading properly.
I’m pretty sure this is what led to the couple of images you see below, shot with the Yashica Electro, where the film burn has gone way too far.
It makes sense that winding only half a frame or so would do this to these shots, as I wasn’t winding enough to get to the next one before closing the camera back.
This is why I say you’ll get consistent results if you always load the same way and don’t mess about like this. Because if you do, then yes, the burn will go too far and leave you with nothing really usable.


Can I make a first of the roll shot with any film camera?
Unfortunately, not every film camera out there will allow you to play around with first of the roll shots. Because you need to be shooting the very next frame after you’ve closed the camera back, you’re going to need one with a manual film advance mechanism.
A lot of point ‘n’ shoots from the 1990s and onwards – like this Canon Sure Shot AF-7 that I always enjoyed shooting – have an automatic motorised film advance.
As soon as you close the camera back on any of these, they wind your film on to frame zero. And when your roll is finished, they wind it all back in for you too. While highly convenient, this system gives you no chance to play with any film burn.
One final thing to note here is that if you get your film developed by a lab and aren’t getting any first of the roll shots in your results when you think you should be, check your negatives to see if any are there.
It could be that the lab presumes you don’t want those frames scanning or printing and so aren’t doing them for you. Unlikely perhaps, and something I’d be disappointed to find out a lab was doing with my film without asking me, but possible all the same.


What if the first of the roll is portrait aspect?
Whether your camera is giving you film burn on the left side of your frames or the right, if your film is loaded horizontally and winds horizontally, the burn is going to be down one of the sides.
This means if you shoot your first of the roll shot in portrait aspect, it’s going to be either at the top or the bottom of your image, depending on which way you rotate the camera.
I feel that should all be quite obvious, but I had a portrait aspect first of the roll image of my own to use in this post so felt it was worth mentioning while I did that.
It can also serve as a reminder that this is another option if you want to get creative and play with deliberate first of the roll shots. You’re not limited to landscape aspect shots only.
If you see something that would look better composed this way up, rotate your camera, And with this way, you have more freedom to get creative as you have the choice of whether to have the burn at the top or bottom too.

What other effects can film burn give you?
Despite all the knowledge we have about what causes first of the roll photographs to happen and being able to deliberately use that to try to get something close to the image we want, there will always be some unpredictability in the endeavour.
There are countless things that could happen to your images, so all I can really do is show you a couple that happened to mine and tell you to expect the unexpected sometimes.
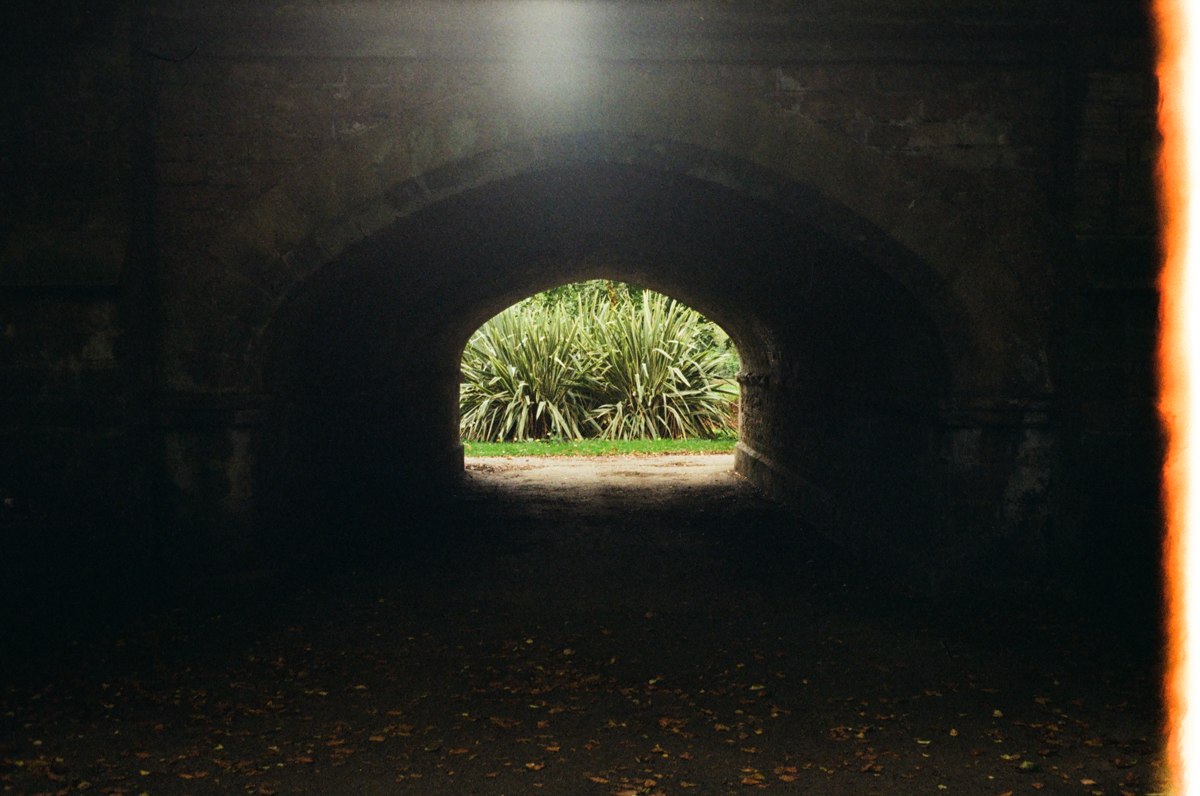
The first different effect is a transparent film burn, as seen in the first shot below, where the rest of the image is actually visible through the burn. This occurs when you load your colour film in a dark place and light doesn’t completely expose all of its layers.
Those that are give you the burn, while those that aren’t give you the image below that.
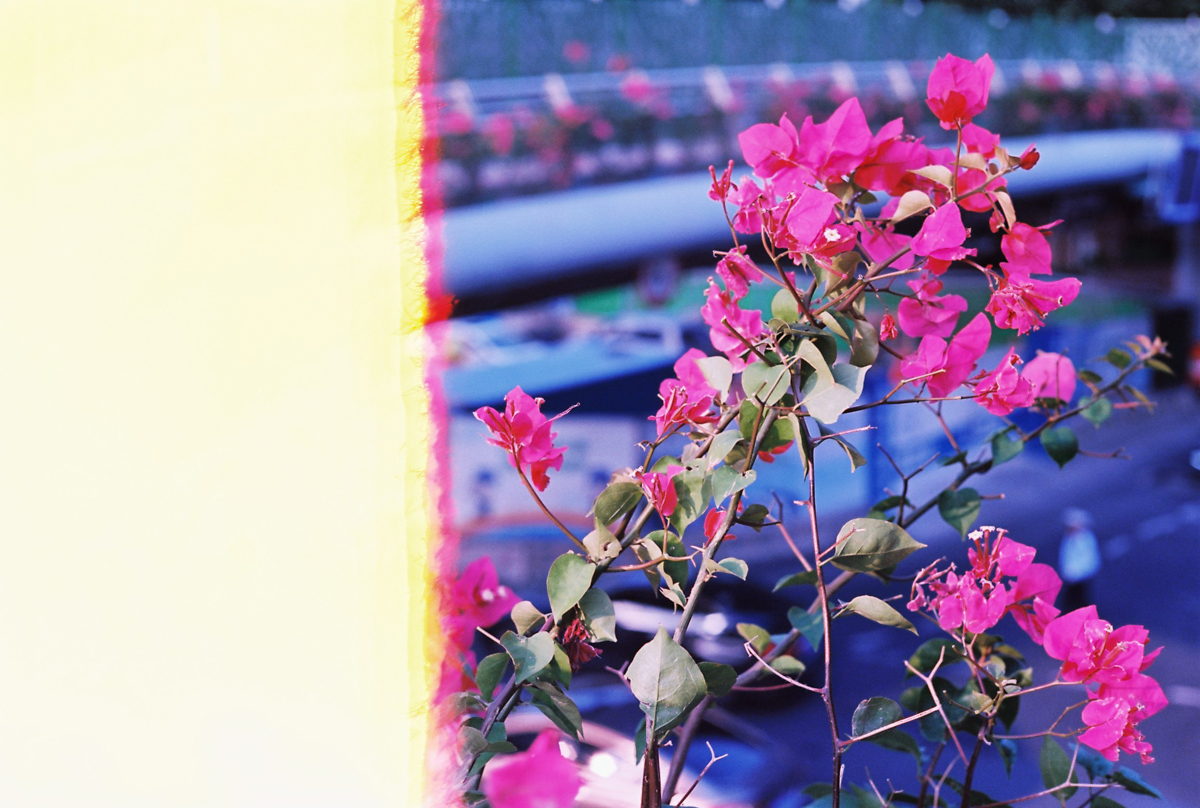
The second image below is displaying some colour shift. It’s not so obvious in the flowers, but it is if you look at the street below them.
I don’t quite know why that happened, but I do know the rest of that roll of Kodak Ektar 100 came out absolutely fine. So I’m presuming the colour shift and the first of the roll effect are related somehow.

What about last of the roll images?
While most of this piece has been centred on first of the roll images, it should be pointed out that last of the roll images are a thing too. A less common thing, but a thing nonetheless.
Some cameras automatically wind your film completely out when you load it and then rewind it back in as you shoot. Just thinking about how this would work makes me believe that, if anything, you’d get film burn on the last of the roll shot here rather than one at the beginning.
The shot below is another taken with my Lomo LC-Wide. I suppose it is a last of the roll shot in a sense, although not one with any film burn. Instead, it looks like I really did just run out of film mid-shot.
With so many types of cameras out there, it’s impossible for me to cover every eventuality here, but I can say the following:
Yes, last of the roll shots are possible with some cameras. But if you have a regular one that has a manual film advance, you’ll be getting a first of the roll shot instead.
The only way to get any film burn on the last shot of your roll would be to open your camera back and expose it to the light. But then you seriously risk ruining the whole thing, which you probably don’t want to do.

What can you do with your first of the roll images?
So if you have a collection of first of the roll images – be that on purpose or having retroactively gone through your archives and found them all like I did for this post – what now can you do with them?
Everything I’m about to suggest below falls under the umbrella of show them to the world, but there are a few ways to do that. Some digital, some tactile.
The biggest and most current collection of this type of photograph is probably on the @f1rstoftheroll Instagram account. It has hundreds of thousands of followers, which makes it perhaps the best place to get the most eyes on your work.
There are also Flickr groups you can join and share your images to, like this one or this one or this one or this one. Whether or not Flickr is worth your time anymore though is something I’ll leave up to you.
For something a little more physical, if you have a decent number of first of the roll shots, you could consider putting them together into some sort of publication.
I personally feel a book would be too much for the ones I have in my archives, but a little zine would certainly be possible one day. Similar to the Shanghai street photography one I made and have available on MagCloud, and that you can read more about here, for example.
Whether you put your images into a zine for yourself to see on paper or to share with others, I think it’s always worth doing. They don’t take long to make and once they’re finished, they’re something that will live on longer than we will.
I also believe creating a book or a zine elevates your photographs – whatever they are of – to something that is more than the sum of their parts. They become infinitely more valuable than they are as a bunch of files on a screen, in my opinion.
And with that thought, it’s probably time to wrap this up.
So the next time you load a roll of film, why not play with your first of the roll shot? Why not do it every time? Why not let your collection build, don’t discard them, and see if you can do something with them one day?
I’m glad that I kept most of mine even when I thought they were junk and had no idea what to do with them either.

An ongoing archive of all my first of the roll photographs
Now I’ve written this post on what first of the roll photographs are, I’ve got a place where I can keep all the ones I get subsequently.
So that’s what follows.
No more words.
Just lots of film burn. 🙂


If you learnt something from that guide to first of the roll shots useful and want to dig into more photography guides, why not take a look at these other posts too:


And if you think others will also find this post useful, help them find it by giving it a share. 😀
