
This Yashica Electro 35 GSN review has been a very long time coming. Perhaps it’s a testament to my powers of procrastination, or perhaps I’ve just been too busy shooting and producing all of this work with it.
I’ll go with the latter there personally, but it’s still no excuse. Especially when it’s a camera that I’ve loved using for a few years now. It’s been great to me and it deserves to be written about.
So that’s what I’m doing now, to the best of my abilities, drawing on all my experience with it, and to help you out with as much information as you’ll need to decide if you want to pick up an Electro too.
We’ll start with a quick overview before diving deeper into the technical specifications and history of the camera, and then get into what it’s like to actually shoot one – and all garnished with plenty of example shots.
Contents
- 1 The two-minute Yashica Electro review
- 2 Yashica Electro 35 GSN specs and details
- 3 History of the Yashica Electro range
- 4 Electrical features of the Electro
- 5 Loading film into the Yashica Electro
- 6 Shooting the Yashica Electro 35
- 7 Yashica Electro example shots
- 8 Street photography with the Electro 35
- 9 Yashica Electro 35 GSN lens
- 10 Yashica Electro battery solutions
- 11 The infamous Electro pad of death
- 12 Downsides to the Yashica Electro
- 13 Should you buy a Yashica Electro?
The two-minute Yashica Electro review
The Yashica Electro is a 35mm film rangefinder camera made by the Japanese manufacturer from 1966 to 1977, with several upgrades introduced as the series evolved.
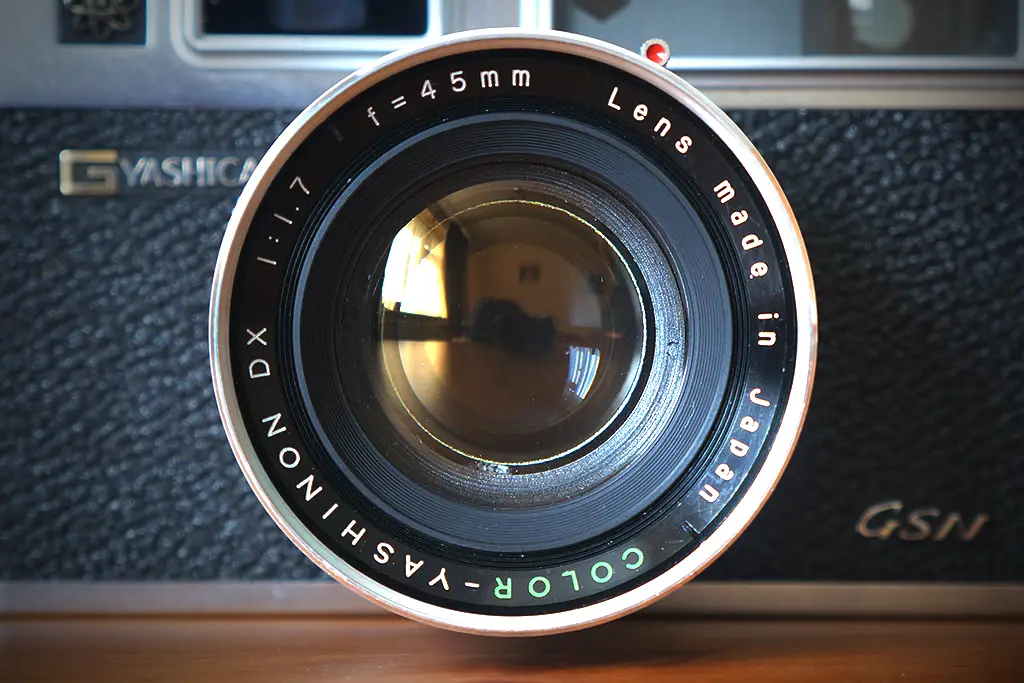
It comes with a good quality fixed 45mm f1.7 Yashinon lens that gives as much sharpness and contrast as you’d expect in your images from a camera of this age at this price range – if not more.
The Electro works in Aperture Priority mode only, which is good if that’s how you’re used to shooting, and good if it isn’t because it will force you to get used to or get better at doing so.
Although it may take a little time to familiarise yourself with the rangefinder focus system if you’ve never played with one before, you’ll be able to quickly and easily compose your shots once you do master it.
Or you could simply leave it at f8 or f11 and zone focus all the time like I do. Because there’s no faster focusing system than just always being in focus.
The maximum shutter speed is 1/500 of a second, which I’ve always found to be plenty for when I’m shooting my Electro out in the streets, and there’s even a Bulb mode too for long exposure shots.
You’ll need to remember to remove the lens cap before you shoot, as the camera won’t tell you that you haven’t. Many a shot has been lost in this way, and probably some whole rolls in some cases too.
Available in black and chrome versions, both of which look very cool with the iconic atom symbol on the front, the Electro found itself on the silver screen in 2012 when wielded by Peter Parker in the Amazing Spiderman reboot.
And just to continue the fictional character theme, it’s often shot today with a Frankenstein’s monster of a battery arrangement, due to the mercury ones it was originally designed to use now being outlawed.
This battery arrangement powers a few electrical features – hence the name – like the in-built light meter and the red and orange lights that tell you if you’re under or overexposed before you shoot.

Yashica Electros are unfortunately susceptible to the so-called pad of death, which is indeed fatal to the camera if left unrepaired. However, with some small tools and just a little knowledge, it can be fixed.
Some people describe the Electro as a poor man’s Leica and mean it as a compliment, although I think such comparisons are actually doing the Electro a disservice.
It’s a great camera in its own right, one of the most handsome ever designed, and easy and fun to shoot.
They’re also inexpensive and readily available on eBay and possibly at KEH Camera too. If you’re into your film cameras, the Electro is one that you should probably play with at least once in your life.
And now you’ve read that quick overview, it’s time to dive deeper into what the Yashica Electro 35 GSN really is.
A classic rangefinder and one of the best-known film cameras ever made. Great value for money with the fast and sharp lens giving you terrific results.
Yashica Electro 35 GSN specs and details
Although the whole Yashica Electro range spanned from 1966 to 1977, the GSN version that I have and am reviewing here was only made in the final four of those years – from 1973 to 1977.
Most of the features remained constant across them all though. This was perhaps a sign of the relatively advanced technology found in the original version, which was the world’s first electronically controlled full-frame camera.
I think some of those features were looking a little dated by the end of the Electro’s run though. Especially its maximum shutter speed of 1/500 of a second and maximum ISO of 1000.
At the other end of the scale, the minimum real shutter speed is 1/30 of a second, although there is a Bulb mode available too. You also get a self-timer but, at the time of writing this, I’ve never used that or Bulb mode.
According to the scale on the lens, the minimum focus distance of the Electro is 0.8 metres, or 2.6 feet. In actual use, you might want to go a touch further away from your subject to stand more chance of it being sharp in your image.
We’ll give the lens a whole section of its own later in this review. For now, it’s enough to know that it’s a 45mm f1.7 effort, with a Copal Electric leaf shutter.
The battery needed for your Electro is another thing we’ll get into later, as the ones it was originally built to take – a Mercury PX23 – are now obsolete.
There is no fully manual mode on a Yashica Electro, and there is no option for Shutter Priority mode either. These cameras work on Aperture Priority mode only, which was actually one of the reasons I bought mine in the first place.
Yashica Electros are around 140 x 90 x 75 mm and weigh around 750 grams without film or a battery inside, which makes them a decently hefty thing to carry around.
Available in chrome and all-black versions across their lifetime, the most commonly reported number of all-time sales is approximately 8 million units.
Scans of the original Yashica Electro user manual can be found right here.

History of the Yashica Electro range
The Yashica 35 GSN that I have is the final version of a wider Yashica Electro 35 range that ran from 1966 to 1977. They started off with the standard chrome and the Professional black versions, with no letters after the 35, and added more as the cameras evolved.
One difference between the original and the second edition Electro G is the name on the lens changing from Yashinon to Color-Yashinon. The tells me the lens I had before to play with on a digital camera was from the original 35.
Don’t go thinking that small name change meant the lens itself changed, though. Adding the word color was nothing other than a marketing ploy as colour films were becoming more affordable to hobbyists.
Another difference, and one that carried on until the end of the Yashica Electro line, was the addition of gold-plated electrical contacts. Apparently this is where the G comes from in the later cameras’ names.
The ISO range was also altered from 10 – 400 to 12 – 500 with the Electro G, with early versions of the subsequent GT having the same until later versions were upgraded to 25 – 1000.
Finally, the 1973 black GTN and chrome GSN Electros both welcomed hot shoes to their repertoire – all earlier models had cold shoes only.
Until 1969, all Yashica Electros were made in Japan. After that, a production line in Hong Kong was also used. As well as figuring it out by the year of manufacture, you can tell a Hong Kong-made Electro by the H before the serial number on the back, as mine has.
| Name | Produced | Colour | ISO (ASA) | Notes |
| Yashica Electro 35 | 1966 – 1968 | Chrome | 10 – 400 | no ‘Color’ on lens |
| Yashica Electro 35 Pro | 1966 – 1968 | Black | 10 – 400 | no ‘Color’ on lens |
| Yashica Electro 35 G | 1968 – 1970 | Chrome | 12 – 500 | – |
| Yashica Electro 35 GT (early) | 1969 – 1970 | Black | 12 – 500 | – |
| Yashica Electro 35 GT (late) | 1970 – 1973 | Black | 25 – 1000 | – |
| Yashica Electro 35 GS | 1970 – 1973 | Chrome | 25 – 1000 | – |
| Yashica Electro 35 GTN | 1973 – 1977 | Black | 25 – 1000 | with hot shoe |
| Yashica Electro 35 GSN | 1973 – 1977 | Chrome | 25 – 1000 | with hot shoe |

Electrical features of the Electro
We’ve already mentioned how the Electro was the world’s first electronically controlled full-frame camera, which is surely where the name and iconic atom symbol on the front came from.
The question is though, what features did you get from this electrical power that you wouldn’t have got without it?
The first and most obvious answer, seeing as the film advance lever tells you there is no motorised film winding mechanism, is probably the built-in light meter.
This is a CdS type, which is short for cadmium sulphide, and is located above the lens rather than being a TTL or through-the-lens type.
Not only do you get that light meter but Yashica also gave you some handy lights to tell you if the shutter speed you need is too slow or too fast. And by too slow or too fast, I mean lower than the 1/30 floor or higher than the 1/500 ceiling that the Electro has.
Pressing the shutter button halfway activates the light meter, which is also how you get the Slow and Over lights to illuminate on the top of your camera, as shown below.


While that’s a handy thing to have happen, these lights aren’t exactly in the easiest-to-see place when you’re lining up a shot. In fact, it’s impossible to see them when you’re looking through the viewfinder.
Fear not though, as Yashica thought of that too and came up with these even handier arrows that light up in said viewfinder.
The red arrow facing to the right corresponds with the red Over light on top, with the orange arrow corresponding to the orange Slow light that was next to the red Over one.
As well as warning you that your shot may be about to be over or underexposed, these arrows helpfully tell you which way to turn the aperture ring to close or open up your lens to correct things.

If you’re not sure whether the batteries in your Electro are working, there’s a Battery Check button on the back of that camera that you can use to find out.
If it didn’t have this, I suppose you could just cover the light meter and half-press the shutter button to see if the orange Slow light comes on, but this makes things way easier to be certain that your battery is working.
Inside the film counter window next to the film advance lever is a little green bulb. Pressing the Battery Check button simply illuminates this. Handy too for if you’re shooting in the dark and want to know how many frames you have left.


Loading film into the Yashica Electro
Loading film into the Yashica Electro is a simple operation if you’ve ever loaded film into any other camera before. In fact, it’s still a simple operation even if you haven’t.
First, pop up the film rewind lever to open the back of the camera and place your roll into the film compartment on the left before pushing the rewind lever back down to fix the roll in place.
Then pull the film leader over to the right and slide it into one of the slots on the take-up spool, ensuring the teeth of the sprocket wheel have gone through the perforations in the film.
Next, press the shutter release button and use the film advance lever to pull the film around the take-up spool. You can do this two or three times to be certain the film is loaded and is advancing properly.
When this is done, you can close the back of the camera and get on with shooting your newly-loaded film. Easy as that.

Shooting the Yashica Electro 35
Perhaps the first thing to know before you try to shoot a Yashica Electro, especially if you’re new to film or have only used SLRs or point ‘n’ shoots before, is that it’s a rangefinder camera.
If you’ve never shot a rangefinder before, you might find the focus system to be quite unlike anything else you’ve shot. The Electro’s works with a split-image in a small yellow diamond in the middle of the viewfinder.
To try to explain in words… in this yellow diamond is a small duplicate representation of what you’re looking at. Like a ghost layer of whatever is in the diamond.
When you’re out of focus, the ghost layer will be offset from the original. Turning the focus ring will move the ghost layer from side to side. When it lines up with the original, you know you have your focus right.
If you’re struggling to picture what I mean, try holding your finger up in front of your face but look beyond it. If your eyes work like mine, you’ll now see two transparent fingers. When you focus back on your finger, these come back together to make the solid finger you see.
I feel the Yashica Electro rangefinder focuses like that. Or that’s the best way I can describe it with words, at least. Because when I tried to take photographs to show you, my phone camera was just focusing itself on the film box.
But you can see the bright yellow diamond and the frame lines, at least.

When you shoot a rangefinder like the Electro, you’re not looking through the lens when you look through the viewfinder as you would be with an SLR. This throws up two more important points that will affect how you compose every shot you take with it.
The first, and most crucial, is to remember to take off the lens cap before you shoot. Because when you’re not looking through the lens, it’s easy to frame and take a shot having forgotten to remove the lens cap.
The Electro will not stop you from doing this and you’ll end up with a blank, wasted exposure. Or a whole roll of film, if you’re really forgetful.
On the other hand, I do find being able to see through the viewfinder without removing the lens cap useful when doing street photography, as I can quickly check to see if a scene has potential just by lifting the camera to my eye.
If it does, then I’ll remove the lens cap. If not, I’ll just move on to the next one.
The second thing to remember is that because the viewfinder and the lens are in different places on the front of the camera, you’re going to be seeing your scene from a slightly different angle to how your lens sees it.
Thankfully, the Electro has a parallax-correcting viewfinder, which adjusts the frame lines to compensate as you adjust focus from near to far or far to near. Subsequently, this is clearly far less important a consideration than leaving the lens cap on.
However, the fact you’re not looking through the lens is still important to remember with tightly-framed or close-up shots.
For example, I can assure you the metal bar in the bottom of this photograph was not in my viewfinder when I shot it. But it was in front of my lens, and no amount of parallax compensation can help with that.
On the other hand, of all the hundreds of images I’ve taken with the Electro, I think this is the only time this has happened to me.

Despite all of the above being new to me too when I bought this Electro, it didn’t take long to get used to everything and for it to become second nature whilst shooting.
Having shot a lot with vintage lenses on a digital camera before, I’d been shooting in Aperture Priority mode for a long time already.
In fact, I remember having the choice between the Electro and a Canon Canonet QL of some type at the time but went for the Electro due to it being an Aperture Priority camera whereas the Canon is Shutter Priority only.
I don’t tend to shoot much with a shallow depth of field any more and the rangefinder focus is very easy to zone focus with at f8 or f11, which is 99% of what I shoot at.
That said, I did try a couple of shots with a wide aperture on the first roll I shot in the Electro. I missed focus on both, as you can see on the first two photographs just below.
Later on though, when I was more used to the camera, I managed to achieve some better results as shown in the third and fourth images below. And you can be sure I’ve had other failures and successes like these in between too.
So don’t worry if shooting the Yashica sounds tricky, or that you have one and can’t get used to it. With practice, you will.


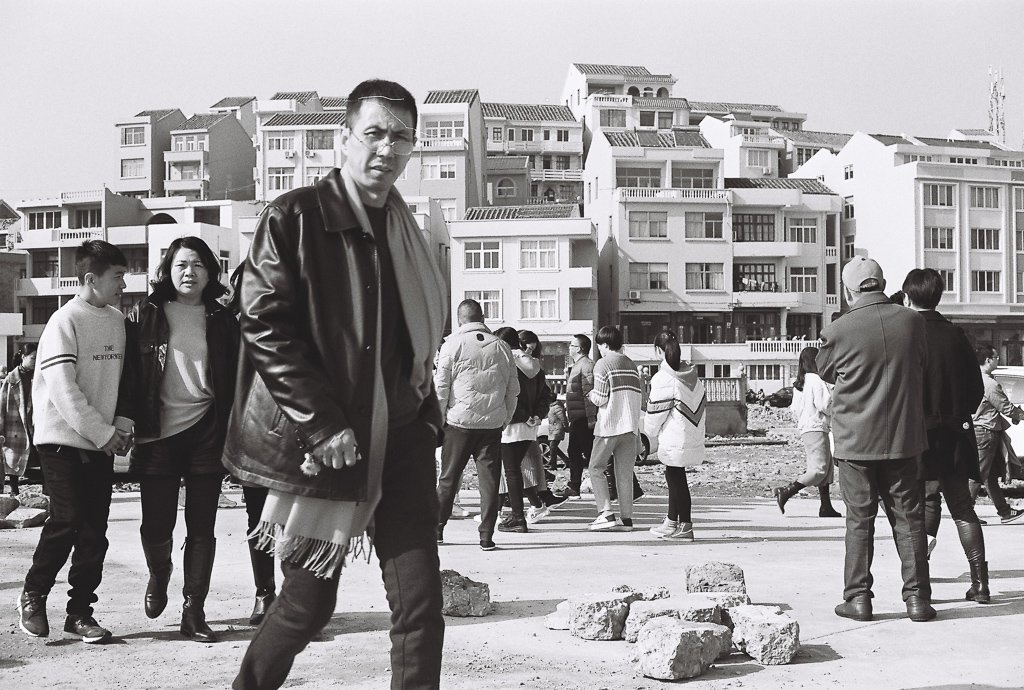
Yashica Electro example shots
I’m going to have to give you more than just those as Electro example shots, though.
Trawling through all the posts I’ve ever written about what I’ve shot with this camera to find some example images for you was a fun trip down memory lane. It was also not easy to choose just 10 colour and 10 monochrome photographs, as there are so many I could have used.
But, helped by giving myself licence to show more in the Yashica Electro street photography section coming up next, I have whittled it down to the following. So with a mix of inanimate objects as well as people, here are 20 Yashica Electro example shots for you.
I’m not commenting on their quality here, by the way. They’re just what I managed to do with the camera at the time so they’re all I have to show.


Street photography with the Electro 35
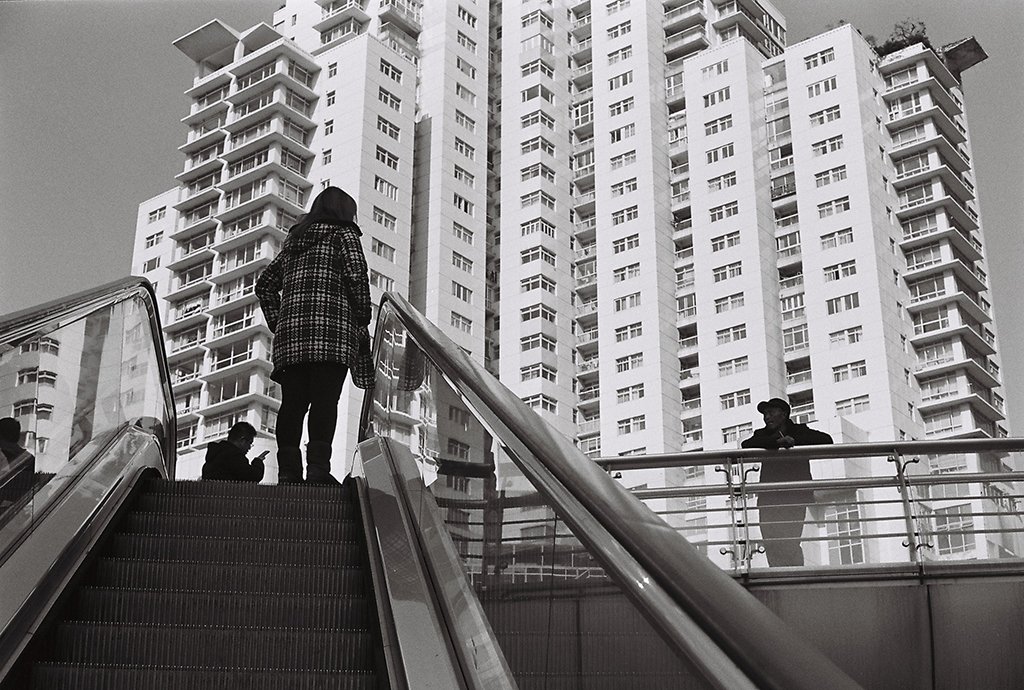
Because I spent a couple of years shooting mainly out in the streets of Shanghai with my Yashica Electro, I think it’s worthwhile telling you my experience with using this camera for street photography in particular.
For me, the only downside to shooting street photography with the Electro was its size and weight. I never felt it was so big it was making me too conspicuous, like a huge DSLR with a telephoto lens might, but it was certainly a little more unwieldy than running around with a point ‘n’ shoot.
It may even be a touch too large to really use with a wrist strap, but I can’t say for sure because I never tried to use one on it.
Instead, I have the long strap over my left shoulder and going diagonally across my body, so the camera is on my right hand side. This keeps it comfortable whilst walking but also quick and easy to grab and use when a shot presents itself.
Something else that’s quick and easy once you get used to it is the rangefinder focus, and you should have no trouble using it for street photography after a little practice.
To make things even quicker and easier though, I just kept it set at f8 or f11 and zone focused all the time. If you’re not sure what that is or how to do it, I suggest you bookmark this guide to zone focusing for later.
In a nutshell though, so long as you’re always shooting with everything in focus and not switching between that and a shallow depth of field all the time, using zone focus means you’re always ready for the next shot – hence things being even quicker and easier.
In fact, the Yashica becomes almost like a point ‘n’ shoot when used like that.
If you’re used to shooting an SLR, you may be surprised how quiet the Electro is too. Because there’s no mirror, you obviously don’t get the loud thud of your SLR’s mirror slap – a sound that everyone, even non-photographers, recognises as a photograph being taken.
The good thing about this from a candid street photography perspective is that your camera isn’t alerting everyone within earshot to the fact you’re shooting whenever you press the shutter.
Overall, I found the Electro to be pretty good for my style of shooting. I like to frame a scene before my eventual subjects have entered it, and the 45mm lens is wide enough to fit a decent amount into a frame.
I also like to have eye contact with at least someone in a lot my images, although it’s not something I always go for. Again with practice, I managed to get okay with timing my shots with the Electro to achieve that
Finally, I’ve included some night and indoor shots taken using only the ambient light available at the time, to show you that’s possible with the Electro too. Perhaps the lack of a mirror mechanism in the camera helps you keep steady at low shutter speeds here.


Yashica Electro 35 GSN lens
The Electro was not an interchangeable lens camera, with all models having the same 45mm f1.7 Yashinon lens fixed to the front. As mentioned, those on any Electro after the first generation were branded Color-Yashinon.
Incidentally, you can find examples of these lenses that have been removed from their original Electro and modified to be fitted to a digital camera. I had one before I ever had an Electro and thought it was pretty good. My review of it is right here.
Construction wise, these lenses are a double Gauss design with six elements in four groups, have five aperture blades, were single coated in amber, and have a 55mm filter thread on the front.
I’ve only heard or read good things about the sharpness of this Yashica lens, and have only experienced good things with it myself – be that on the Electro or the version I used for a spell on my digital camera.
The build quality is also top notch, with a solid and meaty feel and very smooth aperture and focus rings.
It’s worth saying too, in case you haven’t noticed, that it looks beautiful in that shiny chrome colour.

As you can see, the aperture range goes from f1.7 to f16. There’s a flash and a bulb mode on the front too, although I’ve never used either, and a red tab behind the aperture ring that activates the self-timer – which is something else I’ve never used.
The Electro lens has a Copal Electric leaf shutter system inside of it, which has its own pros and cons. On the plus side, it’s very quiet, making only the slightest click sound as you shoot.
That relatively slow maximum shutter speed of 1/500 of a second is the downside to the leaf shutter though, with horizontal and vertical travel shutters found in other camera types being much quicker.
And finally, on the subject of this lens, a reminder yet again to ensure you’ve taken off the lens cap before you shoot. I keep telling you this because the Electro won’t.
Yashica Electro battery solutions
Back when the Electro was being produced, lots and lots of mercury batteries still were too. And thanks to their greater capacity compared to other batteries of a similar size and their highly stable power output, they were hugely popular with camera makers and photographers.
However, due to mercury being pretty harmful to the environment when not disposed of properly, you’re not really going to find batteries containing it outside of button cell ones these days.
Predictably, the Yashica Electro was designed to use a 5.6 volt mercury battery that is no longer available, which means you’re going to have to find an alternative if you want to have all the electrical features working on yours.
One option is a 6 volt A32PX. Some reviews on Amazon state it’s a tight fit in the battery compartment, however.
Another option is a 6 volt PX28 – also known as a 4LR44 – although these are shorter than what the camera was designed to take so you’ll need an adapter of some sort to make them work. There are plenty of these on eBay, though.
However, if you want an easier method and one that uses batteries that are readily available, you can go with the method I employ instead.
Simply take one CR123A and two LR44 batteries, tape them together with the negative sides of the LR44s facing the positive end of the CR123A, and enjoy a long-lasting Yashica Electro battery solution that fits perfectly in the compartment with no adapter needed.


The infamous Electro pad of death
If you’ve read any other pieces before this one on the Yashica Electro, you’ve probably come across the term pad of death.
This lovely-sounding phenomenon is, thankfully, not something I have any experience of dealing with. But it is something worth explaining to you in this review.
When you push the shutter button down on the Electro, two metal pins in the body move vertically along with it.
One of these then returns to its original position as you release the button, but one remains where it moved to until you push the film advance lever. When you do that, the second pin returns to its original position too.
This quick video shows you these two pins in action.
When that second pin does return to whence it came, it hits a small rubber pad underneath the top plate of the camera and you hear a satisfying clonk as it does so.
This pad performs such an important role that when it deteriorates, as rubber does over time, the Electro no longer works as it should and the pad assumes its final form as the pad of death.
You’ll know when it’s happened to you as you’ll begin to miss that clonk.
As the name pad of death suggests, some people take the approach that this occurrence spells the end for their Electro. With the right tools and some rubber or foam tape though, it doesn’t have to be.
By following this written guide or this video, you can fashion yourself a pad of resurrection and bring your Electro back to life.
A classic rangefinder and one of the best-known film cameras ever made. Great value for money with the fast and sharp lens giving you terrific results.
Downsides to the Yashica Electro
Most things so far in this review have been positive, pad of death notwithstanding. So it’s only fair to balance things up and explain some downsides to the Electro and some reasons why you might want to pass and go for a different film camera.
Having a common problem why a certain camera is going to fail is obviously not good whatever make or model that is, and the pad of death does put people off buying an Electro.
However, unless you’re going to buy a Nikon F6, which were only discontinued in October 2020, or one of the many reusable ones on the market like this effort from Harman, wear and tear is always going to be an issue with a film camera. Especially one as old as the Electro.
And at least the pad of death is both repairable and so well-known that people have published guides on how to repair it. If you had something go wrong on another camera, you might not be able to find out how to fix it, if indeed fixing it was possible.
So while the pad of death is a downside and it could happen at any time, even on a newly bought Electro, I don’t think it should kill your desire to have one if you think you really do want one.
Another downside to this camera, for me personally, is the size of it. While not as huge as the aforementioned Nikon F6 for example, it is in a weird kind of middle-ground sizewise.
When I decide to go out with it and I get to shooting, it’s absolutely fine. But therein lies the issue.
I only ever shoot with it when I’ve decided to go out with it. It’s just a little too big for me to keep in my bag in case there’s anything worth shooting on my commute, or to take anywhere unsure whether I’ll be shooting or not.
The point ‘n’ shoots I have like the Canon Sure Shot AF-7 are ideal for this, but you don’t quite get the image quality of the Electro lens with those.
But honestly, those are my only two gripes with the Yashica Electro.
First the pad of death, which it will probably suffer at some point in the future, although I’ve been fortunate enough to avoid it so far.
And second, that it’s a little too big for me to take out unless I’m specifically going out to shoot it. But that’s okay too, as it just makes me go out to shoot it, which is something I like doing.
Whether either of these downsides put you off getting an Electro is something only you can decide.

Should you buy a Yashica Electro?
So here we are. This turned into a pretty big review but you’ve now made it to the end. So let’s wrap it up with a little summation and guidance on whether you should pick up an Electro for yourself.
Let’s start with the easy stuff. Amongst all the history and technical details covered already, I don’t want the following two facts to get lost: that the Electro is both easy and great fun to shoot.
If you’re looking for a fully manual camera or one with things like exposure lock or even an exposure compensation dial, you’ll need to go elsewhere.
I like that in the Electro though. It only does what it does and it looks effortlessly cool whilst doing it. Something about the design makes look like what my mind’s eye thinks a classic camera should look like.
The fast and sharp lens gives great results too, and it’s a camera I’ve been more than happy to have as my good shooter amongst the point ‘n’ shoots and 110 cameras and Lomos or Holgas or whatever else I’ve played with too.
Again, the size of the thing does mean it’s always a decision to go out and shoot with it rather than taking it with me to places where shooting with it isn’t the main reason for going, but that’s fine by me. I like going places just to shoot anyway.
I think I’ll end this with some thoughts on that poor man’s Leica description that Yashica Electros sometimes get. Although meant as a compliment, and I very much can see how it would be given and taken as one, it’s really not my favourite way to describe this camera.
Rather than comparing it to something it isn’t, I think the Electro deserves credit for what it actually is. Despite the fact I’m a poor man without a Leica, the Electro really isn’t a poor man’s Leica at all.
It’s its own thing. It’s a normal man’s Electro. And it’s highly worthy of its place alongside the likes of the Nikon FM3a and countless others in the pantheon of great film cameras.
That’s what I think, anyway. 🙂
If you want to see if you agree, you can get your own Electro from eBay or possibly KEH Camera too.
A classic rangefinder and one of the best-known film cameras ever made. Great value for money with the fast and sharp lens giving you terrific results.
If you found that Yashica Electro 35 GSN review useful, why not check out these other great film cameras too:
- A review of the brilliant Nikon FM3a
- A review of the iconic plastic Holga 120N
- Every single camera review on My Favourite Lens
And if you think others will also enjoy or benefit from this review, help them find it by sharing or pinning.

Thanks for the post. I bought a GT in 2000. It was my favorite travel camera during my frequent flier years and has gone everywhere. It only cost me $15usd so I didn’t worry about it much, the lens is fantastic, and it has always given me perfect exposures, day or night, color or b/w. I use the shotgun shell 4LR44 adapter.The pad of death hasn’t even died…yet. I think if the lens was detachable there would be a lot of Electros on ebay without a lens. The Tomioka lens compares very favorably with any 35mm lens of similar focal length and aperture I’ve used. Truly an outstanding camera.
How I came across your website is because my girlfriend likes my GT a lot so I recently bought her a beautiful Hong Kong GTN. Unfortunately it’s pad has died so I’ll be learning the repair.
Keep up the good work!
Hey DS. Thanks for the kind words.
That’s quite a run you’ve had with your Electro! Fully agree about the quality of the lens, and I really don’t recall many of my images ever being under or over-exposed either. Even the low light or indoor ones shot without a flash. In hindsight I’m really glad I used my Electro so much when I lived in Shanghai as those photographs are important memories for me, and having shot them with this camera in particular means the vast majority of them came out well.
Hope you can get the pad on girlfriend’s repaired without too much trouble! 🙂
Lee
Thank you so much for your review. My only complaint is the lack of shutter speed mode, and not be able to see at what speed I am shooting. The camera works fine, but I have a small problem with the electric contact. When I press the shutter the red or orange light sometimes disapear. I probably need to see if it can be fixed.
Cheers Nuno, I appreciate your saying thank you 🙂
I specifically bought the Electro because I prefer aperture priority over shutter priority, so not having the latter was never an issue for me. 🙂 But yeah, I guess being able to see exactly what speed you were at for a given aperture could have been useful, but for me so long as I was inside the orange and red lights that was enough.
Thanks again man and happy shooting 🙂
Hello
So I found a rechargeable CR123A battery, do you think it would work too like the regular one?
No idea. Only one way to find out. Let us know how it goes. 🙂
Hi Lee- I came across your website to read your “shoot all films” and found this review on the Yashica Electro 35. I picked one up on ebay for $7. It was in mint new condition, but a battery had leaked in the battery compartment and I think that’s why I got it so cheap. I found a guy that restores them on Etsy and sent it off to him for a CLA. 2 months later I got it back, good as new and working like new. I think it’s a great camera to invest in because they’re dirt cheap and everyone seems to stay away from them due to the “pad of death” thing. But it’s easy to find someone to work on them.
Hey Christopher. That’s bloody awesome, getting one in such condition for that price. Thankfully I’ve never had any issues with mine, not even the Pad of Death, but from what I’ve read even that isn’t too difficult to fix even if it does happen. Enjoy using yours mate, I always found it a great camera to use when I was using it a lot and was ‘in tune’ with it. 😀
Hi, great review, I very fond of this camera for a long time, but I don’t know if it’s appropriate for my Goals
, Can you help me? please
I want to photograph mostly the sky, moon, sun, and clouds, as well as street photography and Landscape photography, Do you think Yashica GSN is suitable?
Thank
Hi Mina. I always enjoyed shooting street photography with mine. You’d be ok for landscape too. I wouldn’t recommend it for the moon and sun though, if you mean like astrophotography. Need a much longer lens. An SLR really that you can stick a telephoto lens on.
Great review. I’ll be looking for the right deal on the Electro! I like your solution for the battery. Have you had yours setup that way for a long time without problems?
Hi Doug. Yes, I used that set-up for every roll I shot with the Electro (which was quite a few of them) and never had any issue with it. 🙂
Hi lee. I just bought this camera a few days ago and then used one roll of fuji film but the result is dark. i want to ask, if i have a roll fuji 200, do i have to press the asa setting on the camera with iso 200 as well? then which one is better, is it only the red light that is on, the orange light, or both of them have to turn off? I hope you can reply to my comment. Thank you.
Hi Yogo. If I’m understanding you correctly and you mean the ASA dial then yes, you should turn and set that to the same ASA/ISO rating as your film.
Regarding the red and orange lights, it would be ideal to have neither of them come on really. But film does have some leeway if your exposure isn’t completely exact, so you can shoot with either of them on if they have ‘just’ come on after you changed the aperture by one stop or so, if you know what I mean?
To get set up, once your ASA is set, change the aperture setting on your lens and half-press the shutter release to see if either of them come on. Then keep moving the aperture setting until you find the spot where they don’t, or where the red one changes to orange or vise versa. Then you know you’re pretty much where you need to be.
In time you’ll get a feeling for what this aperture setting will need to be for the light you have available but if you need help with that right now, you could use a light meter app on your phone to guide you.
Does that help? 🙂
ah i see. thank you, lee. this help me alot 🙏🏻
No worries Yogo, happy to help and glad you’ve got it figured out now. 🙂
A great review, and very informative (and lovely) images, that really show off the lens’ seductive qualities, especially the bw images.
Thank you George, I’m glad you took something from this. I haven’t used my Electro for a while as I write this reply but do still have it so I should probably remedy that soon. 🙂
Good day sir! I am just curious how do you convert your 35mm negatives into digital? I’m about to purchase a Yashica electro 35 GSN and I am looking into options how to convert the negatives into digital without sacrificing the film quality of the photos. I’d appreciate a response. Thank you!
Hey Mark. If you send your film off to a good lab then they’ll have a scanning service too. That’s what I do. If you develop yourself then I guess your options are buying a scanner or putting together a DSLR scanning rig. 🙂
Thank you very much for the review, the camera is very good in fact for any purposes of your film photography. Just a little ideas for those who’d like to have one in the future. For battery, instead of 2 LR44 + 1 CR123A, you can use 1 LR44 + 1 CR123A and the camera sill works well with about 10 rolls of film and it’s better because the voltage is lower than 5,6 V (3V + 1,5V vs 5,6V) meanwhile 2 LR44 make it become 6V. Over voltage will cause the life of the camera shorter. Secondly, if you have a camera that is not working with the battery, you still can use it manually, just the speed will always be 500.
Thanks for that tip, Phong. Wouldn’t you need to pack something else into the battery compartment too though? Would having one less LR44 battery mean it wouldn’t touch the contacts on both ends?
Hi, I’ve heard that it is difficult to focus at night with this camera and we have trouble focusing when shooting at night, is that really the case ?? Please share your experience of using yashica gsn at night. Thankful
Hi Mostafa. I never any issue focusing at night with mine. If you look here or here or here you’ll see some shots I got with it at night. They were a couple of years ago now but I really don’t recall having any problem focusing them. 🙂
Did you also use hot shoe flash on your GSN?
I haven’t used the hot shoe flash Jhen, no. I never find myself doing any flash photography really, even if I’m shooting a camera with one built in.
I love your review! Bought one Electro GSN just today after reading your reviews and you made me convinced that my decision was correct.
Anyway, may I know the film youre using on your GSN? Thankyouu
Thank you for reading and the kind words, Jhen. I hope you enjoy shooting your Electro as much as I have done with mine.
I’ve used a few different films in it. They’re all stated in the titles of the photo essays I’ve published on here. I think the best way to see how they look would be to check all the posts tagged with Yashica Electro on the link below and go from there.
Thanks again. 🙂
https://www.myfavouritelens.com/tag/yashica-electro-35/
Thank you! I actually saved your blog for reference HAHAHA. I had my first roll using my yashica GSN however, I could not tell to my friends how to focus, though I tried actually, still all theirs shots of me were blurred while my shots of them we’re okay. May I know the settings that are safe for shooting 😂 Like the aperture and the meter? Thank you again!!
You should be okay focusing with any aperture really, so long as you know how to use the rangefinder focusing. But if you’re not so confident yet, to be safe I’d say stay with f5.6 or f8. And if you’re using that sort of aperture, use an ISO 200 or 400 film, not ISO 100.
Make sure you’re not too close too. The minimum focus distance is 0.8 metres, or 2.6 feet, so make sure you’re further away than that when your friends shoot. 🙂